
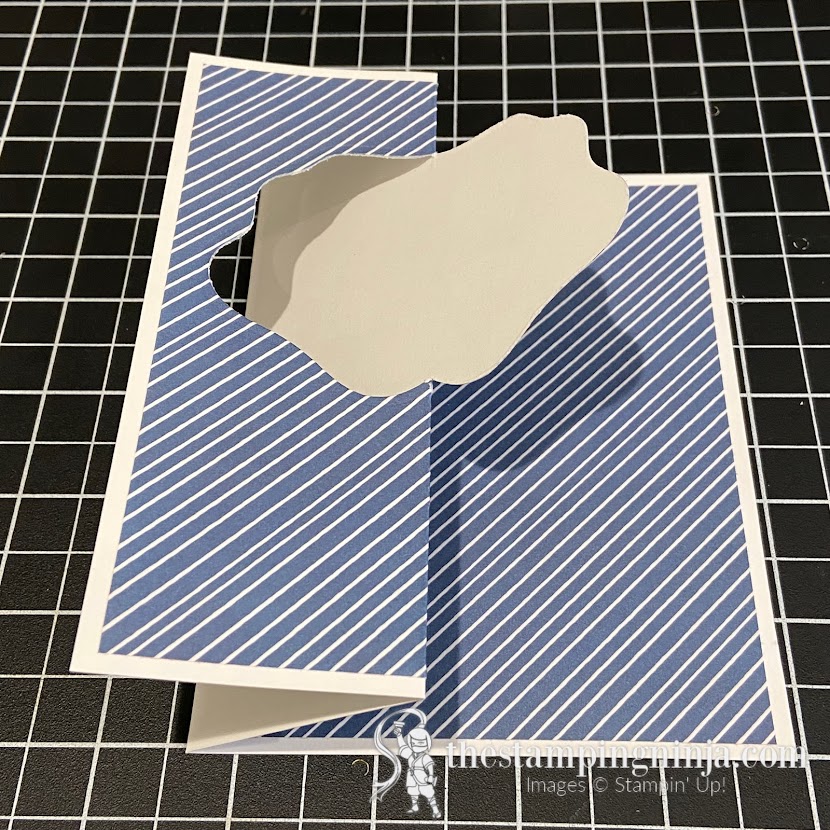
Do you like a challenge? If so, the Penguin Place Anniversary Fun Fold card is for you. I’m not going to lie, this fun fold is a bit tedious. The instructions are a bit long, but I think you will find the end product is absolutely adorable!

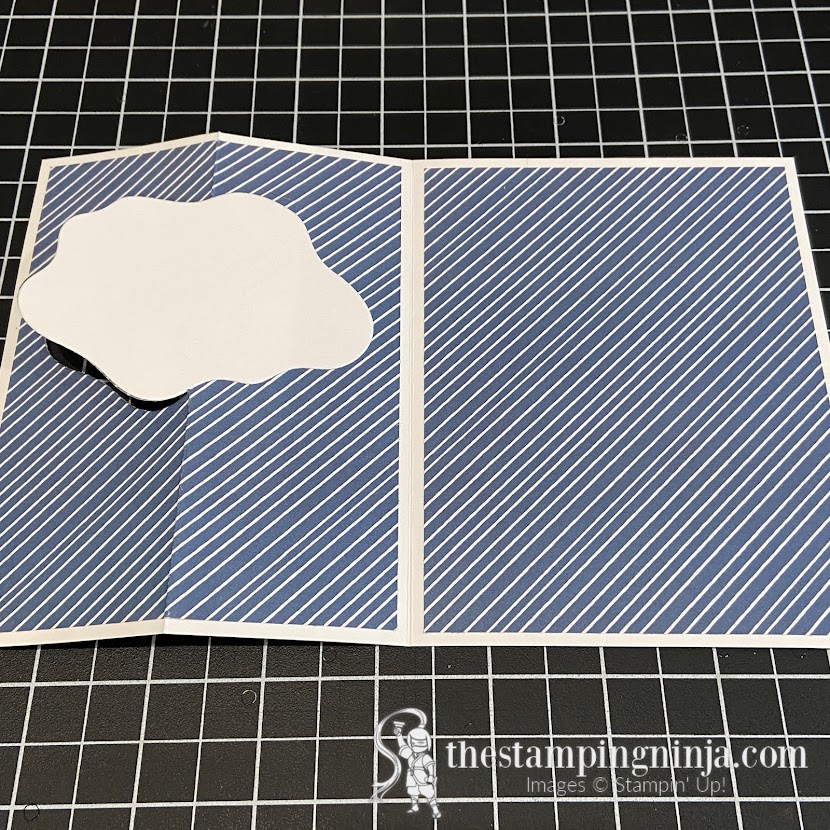
Here is what it looks like when it’s opened.


As I was making this fun, whimsical card, it became a bit complicated. However, the instructions are quite detailed. There are also lots of pictures to help you along the way. So, if you are up for the challenge, I think you will like it too.
Are you ready?
To make the card
- Begin with a 5 1/2″ x 8 1/2″ piece of Basic White cardstock, score and fold at 4 1/4″ to form your card base.
- Open your card up and adhere two pieces of Penguin Playmates designer series paper (DSP), measuring 4″ x 5 1/4″ each, to each side of the card.

- Place the 5th largest Layering Diorama die on top of the left-sided DSP (near the top) and hold in place with a piece of sticky note.

- With a pencil, lightly make a mark on the white border (of the left side of the card) on the top and bottom at the 2 1/8″ mark.

- Place your card on your Stampin’ Cut & Emboss machine with the side with the die going in first.
- Carefully line up the top plate evenly with the two pencil marks that you made and run through your machine. (hint- the plate should only cover the first 2 1/8″ of the card. The remaining card will not be covered when going through the machine.)


- Remove the die, erase your pencil marks, and place your card vertically in your Stampin’ Trimmer, lined up at the 2 1/8″ mark. Score your card from the top of the card to the top of where the die cut has cut the card and from the bottom of the card to the bottom of where the die cut has cut the card.

- Fold the front piece back and burnish with your Bone Folder.
Crop the details
- Using your Stampin’ Cut & Emboss machine again, crop two pieces of Basic White cardstock using the 5th largest die, a piece of Night of Navy cardstock using the 4th largest die, and another piece of Night of Navy cardstock using the 4th and 5th largest dies together to make a thin diorama outline (“ring”).
- Adhere one of the Basic White cutouts to the Night of Navy cutout using Stampin’ SEAL.
- With your card open, adhere the other Basic White piece on the left, inside of the card with Multipurpose Liquid Glue. (It should line up with the cutout that you made.)
- Lay the layered Basic White piece on top of the one you just glued, lining them up perfectly, and apply some Multipurpose Liquid Glue to the top. (hint- line them up by holding on to the portion that is cut out with your finger and thumb and carefully open the card flat. (see photos)


- Slowly close the card by laying the right-hand side on top of the left-hand side. This will ensure that your die cuts are lined up perfectly when your card is closed.


- Open the card back up and adhere the Night of Navy die cut “ring” around the Basic White cutout on the left. Fold the card closed and burnish the “ring” where the fold is with your Bone Folder.


Time to stamp
- Stamp your longer sentiment on a 1″ x 3 1/2″ piece of Basic White cardstock and the smaller sentiment on the inside cutout using Night of Navy ink.
- Punch the ends of your larger sentiment with the Lovely Labels Pick a Punch and adhere it to a 1 1/8″ x 3 3/4″ piece of Night of Navy cardstock that have had the ends punched as well.
- Apply adhesive to half of the sentiment tag and attach to the front of the card, being sure to only apply the glue where the tag is touching the front.
- Stamp three balloons on a piece of Basic White cardstock; one in Balmy Blue, one in Misty Moonlight, and one in Night of Navy ink.
- Fussy cut the balloons out and tie a 6″ piece of Twine around the end of each. (fussy cut means to cut out with your Paper Snips)
- Adhere the Night of Navy balloon on the inside of the card (on the white cutout) using Stampin’ SEAL.
- Attach the Balmy Blue and Misty Moonlight balloon using Stampin’ Dimensionals, overlapping them slightly.
- Gather the twine from each balloon, tie them together with a knot, and secure the knot to the card using a Glue Dot.

And now for the penguins
- Using your Stamparatus, stamp two penguins on a piece of Basic White cardstock using Tuxedo Memento black ink.
- Stamp the penguins beaks using Pumpkin Pie ink, a tie on one of them using Night of Navy ink, and a pearl necklace on the other using Balmy Blue ink. (hint- the “pearl” was made using one of the penguin eyeball stamps)
- Stamp the penguin feet on a piece of Basic White cardstock. Punch them out as well as the penguins out with the Penguin Builder punch.
- Adhere the feet to the penguins using Multipurpose Liquid Glue and attach the penguins to the front of the card using Stampin Dimensionals.
- Attach eight Blue Adhesive-Backed Gems as shown. (three on the front and five on the inside)
- For a little extra “glam”, apply a little dab of Wink of Stella to the pearls.

The instructions are a little tedious, so be sure to download or print the instructions to have them on hand.
I would love to hear from you. Please let me know what you think of the Penguin Place Anniversary Fun Fold card. Will you be giving it a try?

If you would like to purchase the supplies used to make the Penguin Place Anniversary Fun Fold card, you can click here or any of the photos below. When ordering, be sure to enter my monthly host code to take advantage of the Ninja Loyalty Rewards Program.

Sale-A-Bration Join Promotion
Have you ever thought of joining Stampin’ Up!? Now is a great time to do so! Build your starter kit by selecting $125 worth of product for just $99. And, during Sale-A-Bration, you get to choose a FREE stamp bundle from the July-December 2021 Mini.*

*The select stamp bundles can be found on page 19 of the Sale-A-Bration brochure.
If you would like to learn more about joining Stampin’ Up!, you can do so here.
If you enjoyed this post, please be sure to…
- Sign up for my Newsletter and receive a FREE exclusive PDF Tutorial.
- Sign up to get blog posts delivered to your in box.
- Use this Month’s Host Code on orders under $150 to earn your way to a FREE $50 shopping spree on me using the Ninja Rewards Loyalty Program.
- Shop and save the CLEARANCE RACK and PRODUCT BUNDLES.
- View My Gallery for more great inspiration.
- Follow me on PINTEREST, FACEBOOK, INSTAGRAM, and YOUTUBE.
This is really neat!! Your directions and pictures are very clear, I will have to try it! Thanks!
Thank you so much Becky! It was a lot of fun. If you need any help with it, just let me know.?
What a cute card!
Thank you Mary Lou! 🙂