
It’s an Oval Occasions Happy Easter! This weekend is Easter, and I hope that you have a happy one.
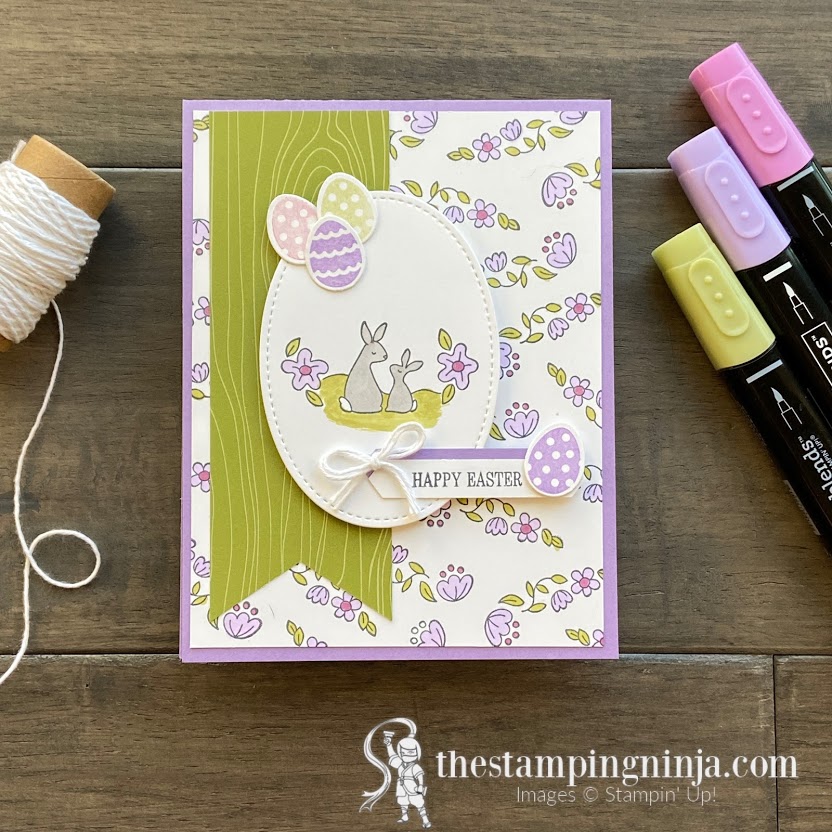
I just couldn’t resist using these little bunnies to make an Easter card. I mean, aren’t they just the cutest??
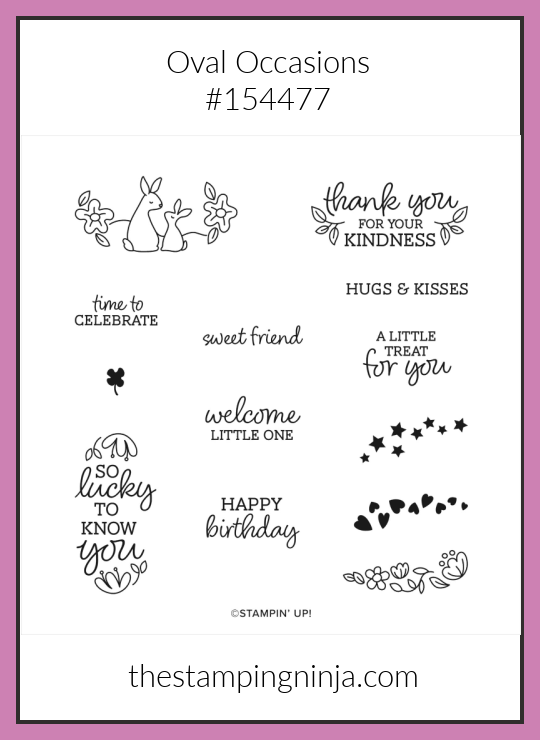
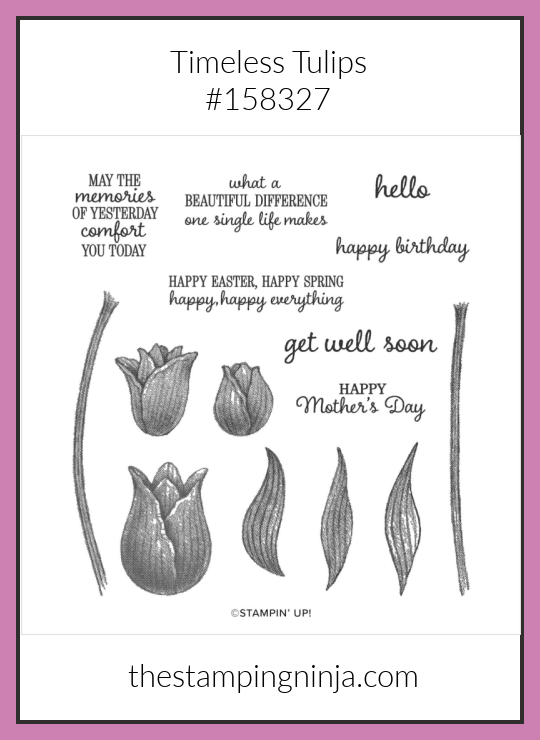
The bunnies come from the stamp set Oval Occasions. It contains 13 cling stamps that cover a broad range of subjects. The sentiment, however, is from the Timeless Tulips stamp set. It contains 15 stamps that include some great sentiments.
Put both of these sets together, and you get a great Easter card!
To make this card
- Begin with a 5 1/2″ x 8 1/2″ piece of Highland Heather card stock, score and fold at 4 1/4″ to form your card base.
- Stamp the flowers in a random pattern on a 4″ x 5 1/4″ piece of Basic White card stock using Tuxedo memento black ink.
- Color the flowers with Old Olive, Purple Posy, and Rococo Rose Stampin’ Blends. Attach to the card base using Stampin’ SEAL.
- Cut a 1 3/4″ x 5 1/4″ piece of Regals designer series paper (DSP). Punch one end with the Banner Triple punch, and adhere to the card using Stampin’ SEAL.
- Crop out a piece of Basic White card stock, with the largest oval from the Stitched Shapes dies, using your Stampin’ Cut & Emboss machine.
- Stamp the bunnies on the oval using Tuxedo Memento black ink. Color with Gray Granite, Old Olive, Purple Posy, and Rococo Rose Stampin’ Blends.
- Stamp your sentiment of a piece of Basic White card stock using Highland Heather ink.
- Punch out the sentiment and a piece of Highland Heather card stock using the Classic Label punch. Layer and adhere the two together, overlapping slightly.
- Adhere the left side of the sentiment to the oval using Stampin’ SEAL. Attach the oval and label to the card using Stampin’ Dimensionals.
- On a scrap piece of Basic White card stock, stamp four eggs: two in Highland Heather, one egg in Melon Mambo (stamped off), and one egg in Soft Sea Foam ink. (stamp off means to ink up your stamp, stamp on a piece of scrap paper, then without re-inking your stamp, stamp your image where desired)
- Crop the eggs out with the Wreath Builder dies using your Stampin’ Cut & Emboss machine.
- Adhere three of the eggs together with Glue Dots. Attach them to the oval, and attach the last remaining egg to the label using Glue Dots.
- Cut two 8″ pieces of Snail Mail twine, put them together and tie a bow, attach to the card using a Glue Dot, and trim the edges as shown.


If you enjoyed this post, please be sure to…
- Sign up for my Newsletter and receive a FREE exclusive PDF Tutorial.
- Sign up to get blog posts delivered to your in box.
- Use this Month’s Host Code on orders under $150 to earn your way to a FREE $50 shopping spree on me using the Ninja Rewards Loyalty Program.
- Shop and save the CLEARANCE RACK and PRODUCT BUNDLES.
- View My Gallery for more great inspiration.
- Follow me on PINTEREST, FACEBOOK, INSTAGRAM, and YOUTUBE.