

Hello, welcome to the Stampin’ Pretty Pals’ Blog Hop! This month our Design Team created projects showing “My Favorite Things” from any of the two current catalogs or the upcoming catalog in January. We hope you enjoy and will be inspired by them! Don’t forget to leave comments! We love hearing from you. At the end of my post, you will find the full line-up to help you “hop” along from Pal to Pal.
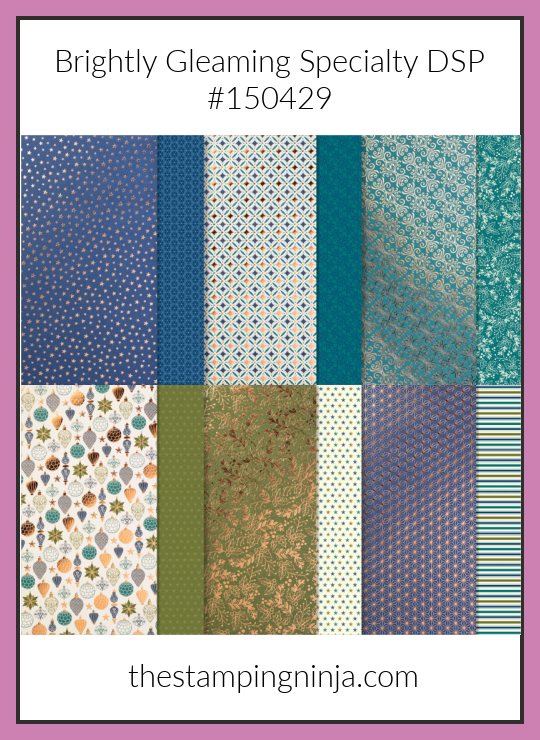
I don’t know about you, but I have a hard time picking one “favorite” product from the catalog. I love pretty-much everything in them! When I really think about it though, I am actually drawn to the designer series paper. I have to have it all, although I sometimes hesitate cutting it. It is all so gorgeous, but the one that sticks out is the Brightly Gleaming Specialty designer series paper.
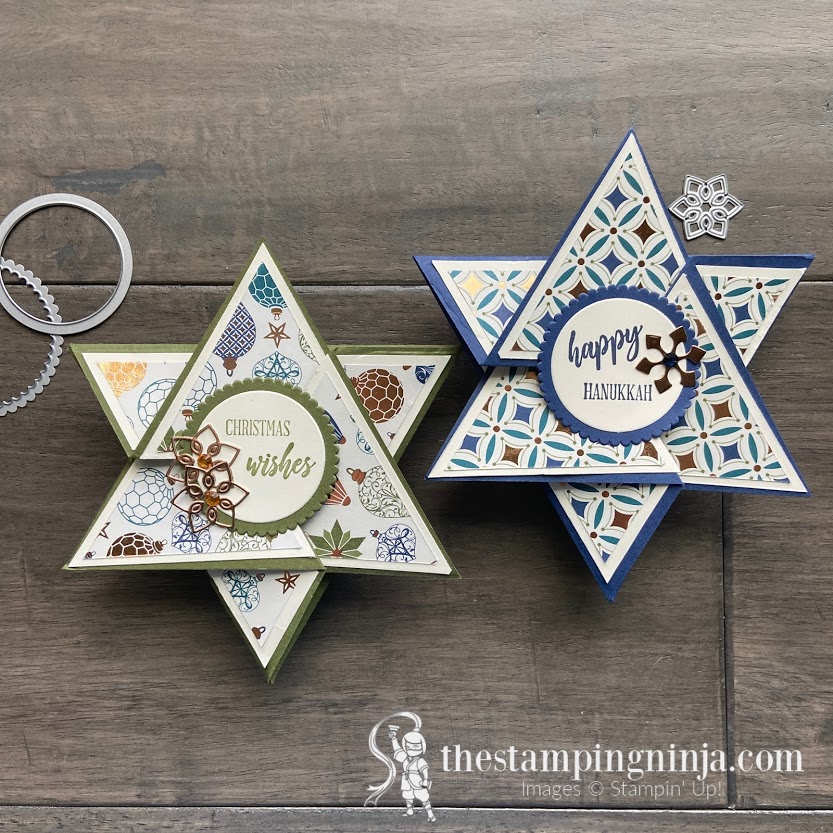
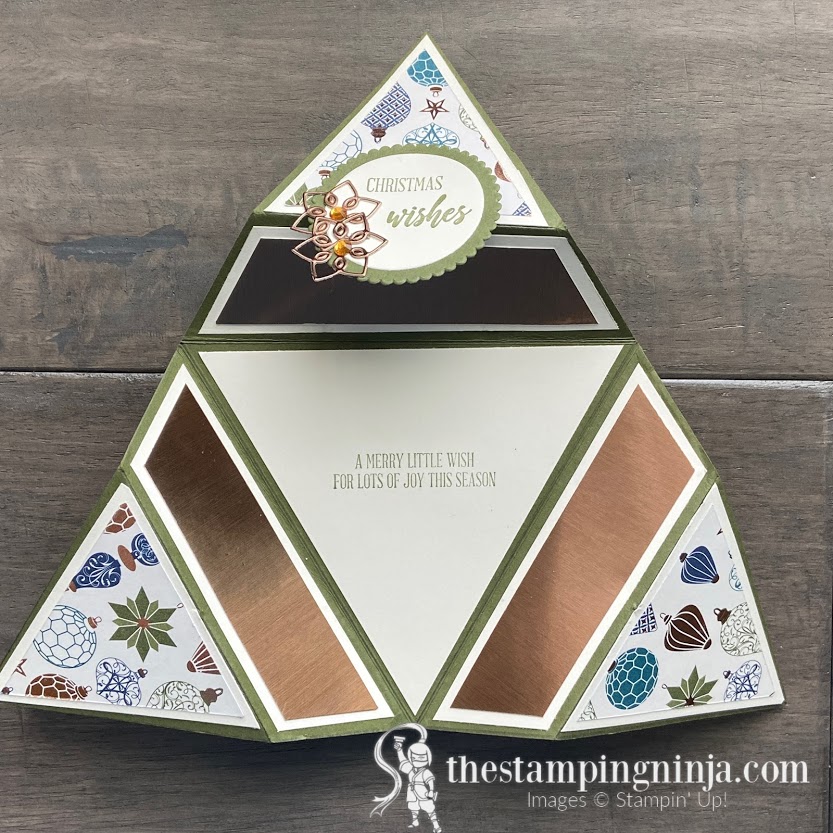
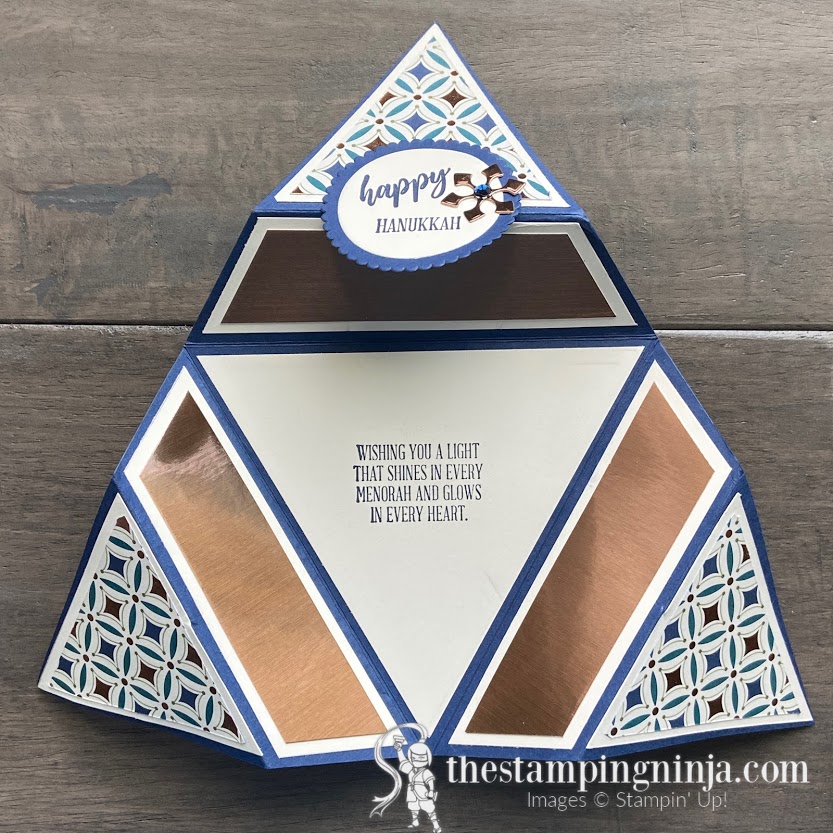
To highlight all of it’s gorgeousness, I decided to do a couple of fun-fold star cards. They will fit perfectly in a 6” x 6” square envelope, but will require extra postage.
To make these cards
These cards are fun, but a little challenging to make.
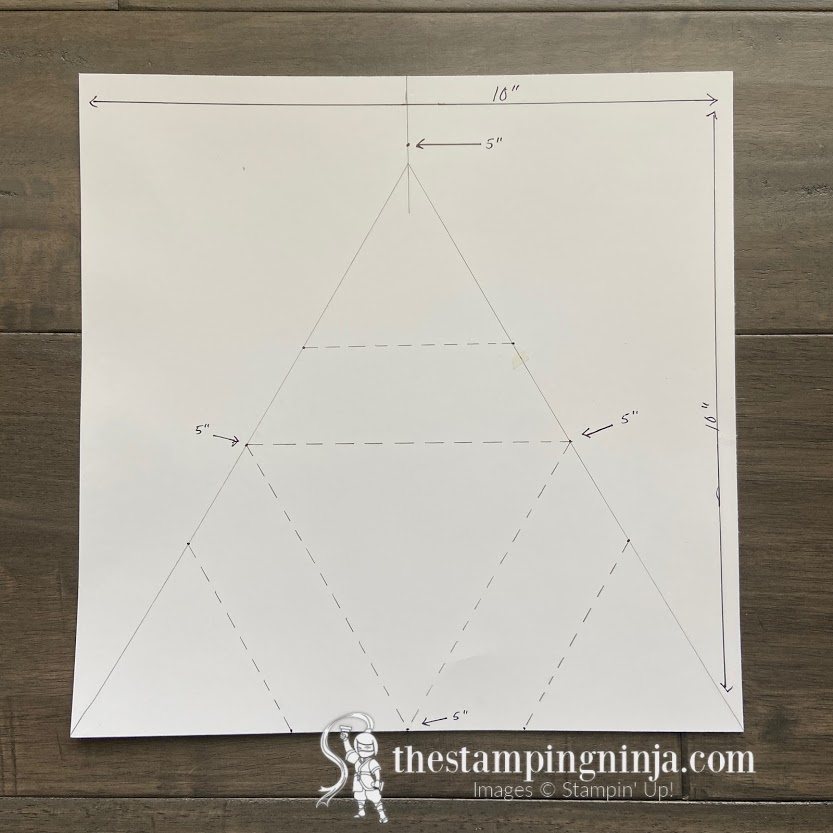
For the Base
- Begin with a 10” x 10” piece of your favorite color or card stock and have a pencil ready. (Be sure to erase any pencil lines that show on your finished project)
- At the top of one side, measure to the 5” mark and draw a vertical line about 2” down.
- Measure and draw a line 10” from each bottom corner to the center line that you just drew to form a triangle.
- On each side of the triangle, measure and mark at 5”. Connect the three marks that you just made to form the inner triangle (first valley fold).
- From those three same marks, measure and mark 1 ¾” on both sides of each mark. Connect the measured marks to give you your second fold (a peak fold).
- Cut out the triangle using your paper trimmer and score the six inner lines that you made for your folds to form your card base.
Make the layers
- The small triangle layers are made using the same technique for the large triangle.
- For the inner triangle – On a 4 3/4” x 4 3/4” piece of Very Vanilla card stock, measure to the 2 7/8” mark and draw a vertical line about 1” down.
- Measure and draw a line 4 3/4” from each bottom corner to the center line that you just drew to form a triangle.
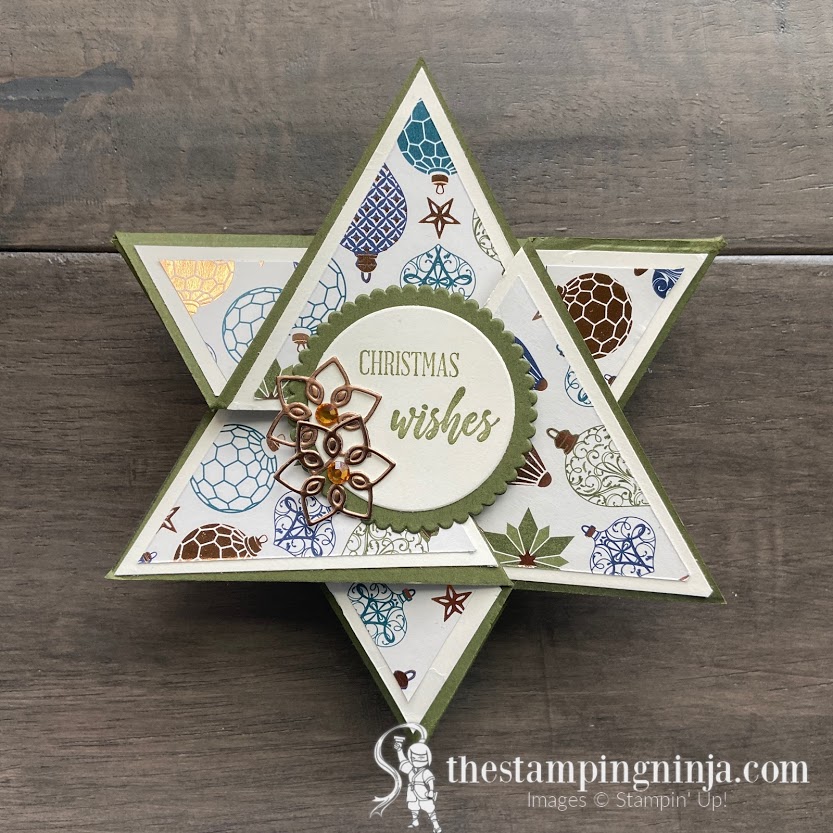
- Cut out the triangle, stamp your sentiment on it in matching ink, and adhere it to the center of the card.
- For the three triangle points – (Layer 1) On a 3” x 3” piece of Very Vanilla card stock, measure to the 1 ½” mark and draw a vertical line about 1” down.
- Measure and draw a line 3” from each bottom corner to the center line that you just drew to form a triangle.
- Cut and adhere the triangle to the card. Repeat for all points.
- (Layer 2) On a 2 ¾” piece of Brightly Gleaming DSP, measure to the 1 7/8” mark and draw a vertical line about 1” down.
- Measure and draw a line 2 ¾”” from each bottom corner to the center line that you just drew to form a triangle.
- Cut and adhere the triangle to the card. Repeat for all points.
For the middle layers
- Cut a 1 1/4” x 5” piece of Very Vanilla card stock and lay it on to the card (do not adhere). Using a ruler, draw a diagonal line on the ends, 1/8” away from the outer edge of the card, trim, then adhere to the card. Repeat 5 more times. (3 are for the backside)
- For the second layer, cut a 1 x 4 ½” piece of Brushed Metallic Foil paper and lay it on to the card (again, do not adhere). Using a ruler, draw a diagonal line on the ends, 1/8” away from the edge of the first layer, cut, then adhere to the card. Repeat 5 more times.
Decorate
- Using the Layering Circles dies, crop two pieces of card stock. One with your choice of card stock with the 5th largest scallop circle and one in Very Vanilla with the 6th largest circle.
- Stamp your sentiment on to the Very Vanilla circle using a matching ink and adhere it to the scallop circle.
- Adhere the sentiment to the lower half of top triangle, being sure to only put adhesive on the top left corner. The right corner needs to remain unglued to fold it up.
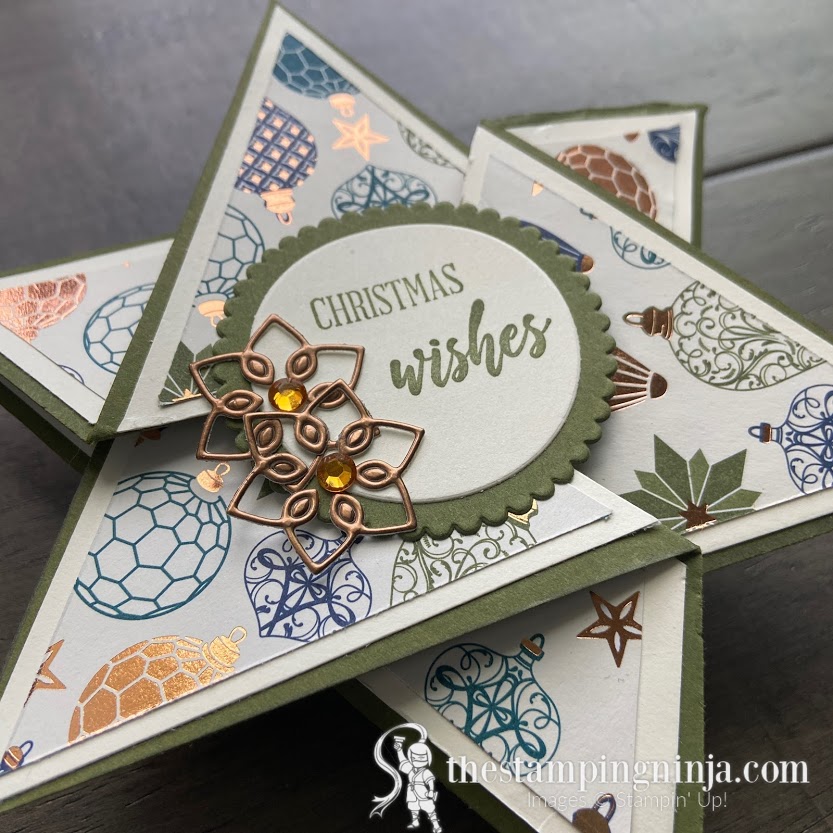
- Crop the snowflakes in Brushed Metallic Foil paper with the Christmas Layers dies using your Stampin’ Cut & Emboss machine.
- Adhere the snowflakes to the sentiment and add the Holiday Rhinestone Gems to the centers as shown.
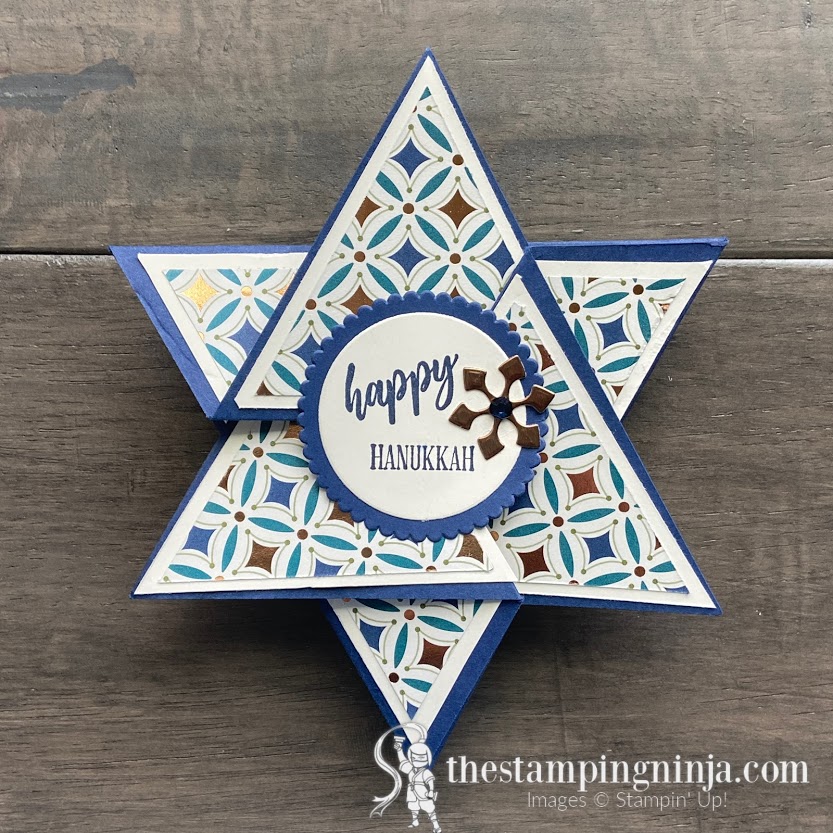
To fold the card
- First, fold the right side in.
- Second, fold the left side in on top of the right.
- Lastly, fold the top down, while simultaneously lifting the right side to tuck the right side under the sentiment.

A complete PDF tutorial can be found by clicking on the button below.
Before you go
More inspiration awaits! Use the Blog Hop Line-up below to visit the rest of this month’s Design Team. My fellow Pals are excited to show you what they’ve created! Mark your calendars for our next blog hop on January 13th when our theme will be Time to Sale-A-Brate. Participants will showcase tags or 3D items that will be great for gifts for any occasion. Don’t miss the fun! Until then, please stay safe and have fun in your craft room.
Stampin’ Pretty Pals’ Blog Hop Line-up
- Mary Fish at Stampin’ Pretty
- Mary Hanson at Up North Stampin’
- Debbie Mageed at Secrets to Stamping
- Tricia Chuba at ButterDish Designs
- Wendy Klein at Doggone Delightful Stampin’
- Jackie Beers at Blue Line Stamping
- Sue Jackson at Just Peachy Stamping
- Melissa Seplowitz at The Stamping Ninja
- Jeanie H Stark at Just Stampin’
- Lisa Ann Bernard at Queen B Creations
- Debbie Crowley at expressivelydeb…
- Stesha Bloodhart at Stampin’ Hoot!
- Jennifer Roque at Stamp Camp with Jen
- Lori Pinto at LollyPop Paper and Ink
- Pamela Sadler at Stampin Pink Rose
- Beth McCullough at Stamping Mom
- Su Mohr at Aromas And Art
- Jennifer Michalski at Stamping Serenity
- Deb Walker at Deb Stamps Life
- Peggy Noe at Pretty Paper Cards
- Rae Harper Burnet at Wild West Paper Arts
- Lori Webb at Clever Copies
- Renae Novak at Blessed By Cards w/Renae Novak
- Lisa Milligan at Stamp a Rainbow
I would love to hear from you. Please let me know what you think of my favorite things.

Thanks so much for this great design that truly jumps out at the eye & without question I know its intent. it certainly brings forth the spirit of the holiday. WOnderful job! (So sorry for all caps—my ipad is having an issue. or, perhaps it me.) Thanks again.
Thank you so much Denise! I have those types of issues with technology too, so no worries. 🙂
Melissa, these are wonderful! I actually made one for hanukkah and will be posting it on friday. Love your tutorial (I will link mine to your post, thanks!) – kinda wish I had it when i made mine! 😉 Hope you have a great holiday season with your family!
Thank you Debbie! I can’t wait to see yours on Friday!
Wow! I can’t wait to try this. These are beautiful!
Thank you Lisa! I’m so glad you like them.:-)
Your stars are amazing, melissa! Great job!
Thank you so much Su!
Fabulous project! Looking forward to giving this a try. Thanks!
Thank you Renea! Let me know if you have any problems replicating it. 🙂
Melissa, your fun fold is stunning! I agree with you on the Brightly gleaming DSP. I have it, love it and always hesitate to cut it.
Thank you Debbie! Making that first cut is so hard, but it does get easier after that.
I love Fun Folds. So i cannot wait to give this one a try! It is beautiful.
Thank you Jackie! This one does take some time to make, but it’s sooo worth it!